GNPS (Go Network Programming School)의 내용을 정리한 글입니다.
Go 언어를 활용한 네트워크 프로그래밍 - 책으로 스터디를 진행합니다.
Go의 net/http 패키지는 추상화가 매우 잘 되어 있어 서버 초기화 및 설정, 리소스 생성, 요청 처리에 집중할 수 있습니다. HTTP 서버는 서로 활발하게 통신하는 여러 요소로 구성되어 있으며, 핸들러(Handler), 미들웨어(Middleware), 그리고 멀티플렉서(Multiplexer)의 상호작용으로 이루어져 있습니다. 웹 서비스는 이런 요소들을 전부 포함하는 서버를 의미합니다.
Go HTTP 서버 해부
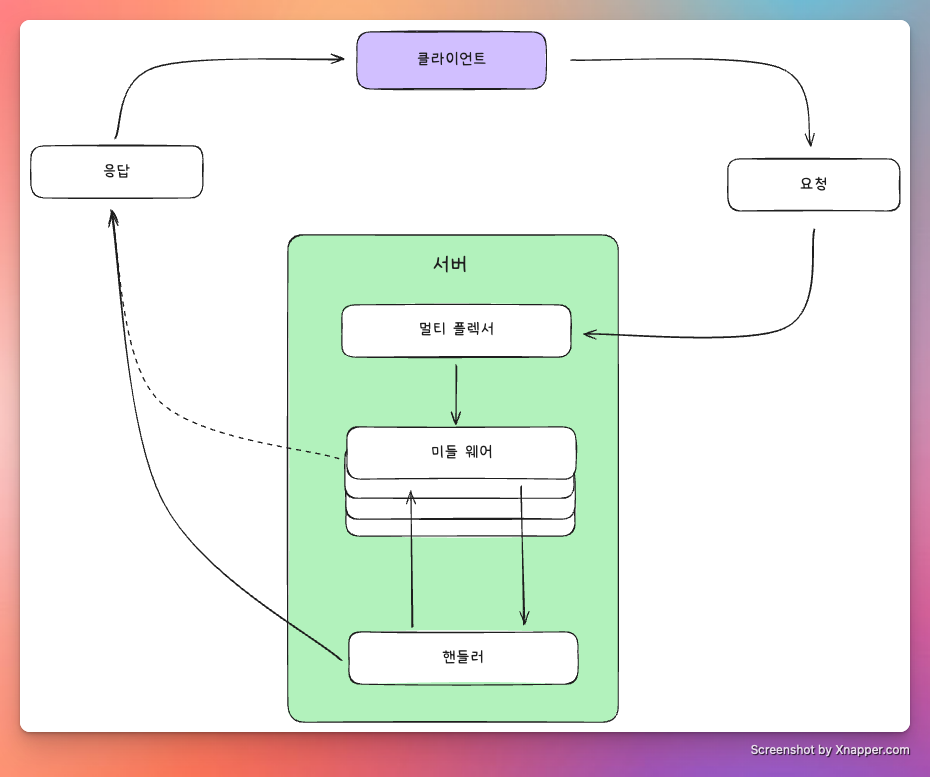
서버의 멀티플렉서(네트워크 용어로는 라우터)는 클라이언트 요청을 수신합니다. 멀티플렉서는 요청의 목적지를 결정한 후 해당 요청을 처리할 수 있는 핸들러로 요청을 전달합니다. 핸들러가 요청을 넘겨받기 전에, 멀티플렉서는 먼저 요청을 미들웨어라고 불리는 하나 이상의 함수로 전달합니다. 미들웨어는 핸들러의 동작을 변경하거나 로깅, 인증 및 접근 제어 등 요청 및 응답에 대한 부가적인 작업을 수행합니다.
아래는 서버의 HTTP 서버의 기본적인 핸들러를 사용해서 멀티플렉서를 사용하는 대신 모든 요청을 처리하는 하나의 핸들러만을 지정한 예제입니다.
package httpserver
import (
"bytes"
"fmt"
"html"
"io"
"net"
"net/http"
"testing"
"time"
)
func TestSimpleHTTPServer(t *testing.T) {
// DefaultServeMux에 핸들러 등록
http.HandleFunc("/", func(w http.ResponseWriter, r *http.Request) {
switch r.Method {
case http.MethodGet:
fmt.Fprint(w, "Hello,friend!")
case http.MethodPost:
body, err := io.ReadAll(r.Body)
if err != nil {
http.Error(w, "Failed to read body", http.StatusInternalServerError)
return
}
fmt.Fprintf(w, "Hello, %s!", html.EscapeString(string(body)))
default:
http.Error(w, "Method not allowed", http.StatusMethodNotAllowed)
}
})
srv := &http.Server{
Addr: "127.0.0.1:8081",
Handler: http.DefaultServeMux,
IdleTimeout: 5 * time.Minute,
ReadHeaderTimeout: time.Minute,
}
l, err := net.Listen("tcp", srv.Addr)
if err != nil {
t.Fatal(err)
}
go func() {
err := srv.Serve(l)
if err != http.ErrServerClosed {
t.Error(err)
}
}()
testCases := []struct {
method string
body io.Reader
code int
response string
}{
{http.MethodGet, nil, http.StatusOK, "Hello,friend!"},
{http.MethodPost, bytes.NewBufferString("<world>"), http.StatusOK, "Hello, <world>!"},
{http.MethodHead, nil, http.StatusMethodNotAllowed, ""},
}
client := new(http.Client)
path := fmt.Sprintf("http://%s/", srv.Addr)
// 테스트 케이스 실행
for i, c := range testCases {
r, err := http.NewRequest(c.method, path, c.body)
if err != nil {
t.Errorf("%d: %v", i, err)
continue
}
resp, err := client.Do(r)
if err != nil {
t.Errorf("%d: %v", i, err)
continue
}
if resp.StatusCode != c.code {
t.Errorf("%d: unexpected status code: %q", i, resp.Status)
}
b, err := io.ReadAll(resp.Body)
if err != nil {
t.Errorf("%d: %v", i, err)
continue
}
_ = resp.Body.Close()
if c.response != string(b) {
t.Errorf("%d: expected %q; actual %q", i, c.response, b)
}
}
if err := srv.Close(); err != nil {
t.Fatal(err)
}
}Listener가 수행하는 Accept()와 연결마다 새로운 고 루틴을 생성하여 처리하고, 요청 헤더/본문을 읽고 파싱 하며, 응답 작성 및 연결 관리 등 다양한 구현을 추상화한 Serve 메서드를 호출합니다. 서버가 정상적으로 종료되면 err.ErrServerClosed를 반환합니다.
테스트 케이스를 미리 정의하고 루프를 순회하며 각 테스트 케이스에 대해 테스트를 실행합니다. 각 테스트 케이스별로 상태 코드를 확인하고 응답을 확인하며 테스트를 검증합니다.
클라이언트가 에러를 반환하지 않는다면 습관적으로 항상 응답 본문을 닫아야 합니다. 그렇지 않으면 문제가 생긴 경우 TCP 연결을 재사용하지 못할 수 있습니다. 테스트가 완료된 후 서버의 Close 메서드를 호출하며 서버를 중단합니다.
웹 서버가 갑작스럽게 종료되면 일부 클라이언트는 웹 서버로부터 절대 응답을 받지 못해 무한정 대기하는 상태가 될 수 있습니다. 이를 위해 우아한 종료(Graceful Shutdown)를 서버에서 구현할 수 있으며, 우아한 종료는 클라이언트가 생성한 모든 요청에 대해 서버가 중단되기 이전까지 응답을 할 수 있도록 보장하는 메커니즘입니다. 이는 뒤에서 알아보겠습니다.
타임아웃은 중요합니다
클라이언트의 타임아웃 값을 설정해야 하는 것과 마찬가지로 서버의 다양한 타임아웃도 관리되어야 합니다.
클라이언트는 클라이언트대로 타임아웃을 구현할 것이며, 서버는 서버 내의 컴퓨팅 자원을 사용하여 전체 요청을 응답할 때까지 계속 실행되기 때문에 서버의 타임아웃을 적절하게 설정하고 요청이 의도한 시간 내에 종료할 수 있도록 설정하는 것은 서버 개발에 굉장히 중요한 부분입니다.
위 테스트 코드에서는 두 가지 서버의 timeout 값인 IdleTimeout과 ReadHeaderTimeout을 설정하였습니다.
IdleTimeout은 HTTP의 keep-alive를 사용하는 경우 다음 클라이언트 요청을 기다리는 동안 서버의 TCP 소켓을 열어 두는 시간을 지정합니다. ReadHeaderTimeout은 요청 헤더를 읽는 동안 기다리는 시간을 지정합니다.
추가적으로 ReadTimeout을 설정하면 모든 핸들러에 대해 입력 요청 시간 제한을 강제하여 요청 데드라인을 관리할 수 있습니다. WriteTimeout을 설정하면 요청을 쓰고 응답을 읽는 동안의 기간을 설정할 수 있습니다.
TLS 지원
HTTP 트래픽은 플레인 텍스트이지만 TLS를 이용하면 HTTP를 암호화된 통신인 HTTPS로 사용할 수 있습니다.
TLS 활성화는 아래 코드처럼 변경하여 사용 가능합니다.
srv := &http.Server{
    Addr:              "127.0.0.1:8443",
    Handler:           http.DefaultServeMux,
    IdleTimeout:       5 * time.Minute,
    ReadHeaderTimeout: time.Minute,
}

l, err := net.Listen("tcp", srv.Addr)
if err != nil {
    t.Fatal(err)
}

go func() {
    err := srv.ServeTLS(l, "cert.pem", "key.pem")
    if err != http.ErrServerClosed {
        t.Error(err)
    }
}()
server의 port 번호를 반드시 바꿔야 하는 것은 아니지만 443은 https로 사용되는 포트이며, 일반적으로 443에 다른 숫자를 추가하여 서비스하는 것이 일반적입니다.
ServeTLS() 메서드를 사용하여 HTTPS를 사용하도록 합니다. 추가적인 매개변수로 인증서와 개인키 경로를 지정하여 암호화 통신에 사용할 수 있도록 지정합니다.
핸들러
클라이언트가 HTTP 서버로 요청을 보내면 서버는 먼저 그 요청으로 무엇을 할지 파악해야 합니다.
서버는 클라이언트 요청에 따라 다양한 미디어를 받아와야 할 수도 있고, 동작을 수행할 수도, 특정 데이터를 가져와야 할 수도 있습니다. 이런 문제를 해결하기 위해 일반적인 디자인 패턴은 핸들러라고 부르는 요청을 처리할 수 있는 코드를 작성하는 것입니다.
하나의 동작을 하는 핸들러를 만들고 멀티플렉서를 통해서 특정 작업을 수행하는 핸들러로 요청을 보냅니다.
Go에서는 핸들러를 http.Handler 인터페이스를 구현한 객체입니다. 해당 인터페이스를 구현한 객체는 모두 클라이언트의 요청을 처리할 수 있습니다.
type Handler interface {
	ServeHTTP(http.ResponseWriter, *http.Request)
}
http.HandlerFunc 메서드의 매개변수에 핸들러 인터페이스 구현을 매핑할 수 있습니다.
handler := http.HandlerFunc(
	func(w http.ResponseWriter, r *http.Request) {
    	_, _ = w.Write([]byte("Hello, world!")
    }
)
다음은 DefaultHandler() 함수로 http.HandlerFunc를 사용하여 http.Handler 인터페이스를 구현하고 기본적인 GET과 POST 요청을 받는 핸들러를 구현한 예제입니다.
package httpserver

import (
	"fmt"
	"io"
	"net/http"
)

func DefaultHandler() http.Handler {
	return http.HandlerFunc(func(w http.ResponseWriter, r *http.Request) {
		defer func(r io.ReadCloser) {
			_, _ = io.Copy(io.Discard, r)
			r.Close()
		}(r.Body)

		switch r.Method {
		case http.MethodGet:
			w.WriteHeader(http.StatusOK)
			fmt.Fprintln(w, "Hello! This is a GET Request")
		case http.MethodPost:
			w.WriteHeader(http.StatusOK)
			fmt.Fprintln(w, "Hello! This is a POST Request")
		default:
			w.Header().Set("Allow", "GET, POST")
			http.Error(w, "Method not allowed", http.StatusMethodNotAllowed)
		}

	})
}
defer로 호출된 부분은 함수의 요청 본문을 소비하고 닫습니다. 요청 본문을 닫더라도 서버에서는 남은 데이터를 소비하지 않기 때문에 확실한 TCP 세션 재사용을 위해서는 명시적으로 선언을 해주는 습관을 가지는 것이 좋습니다.
httptest를 이용한 핸들러 테스트
net/http/httptest 패키지는 핸들러의 유닛 테스트를 가능하게 하는 패키지입니다.
package httpserver

import (
	"net/http"
	"net/http/httptest"
	"testing"
)

func TestHeandlerWriteHeader(t *testing.T) {
	handler := func(w http.ResponseWriter, r *http.Request) {
		_, _ = w.Write([]byte("Bad request"))
		w.WriteHeader(http.StatusBadRequest)
	}

	r := httptest.NewRequest(http.MethodGet, "http://test", nil)
	w := httptest.NewRecorder()

	handler(w, r)

	t.Logf("Response status: %q", w.Result().Status)
}
위 코드는 httptest 패키지를 이용해서 request와 response 객체를 만들고 해당 객체를 사용해 handler 요청을 보내는 코드입니다. 여기서 handler 내부에서 w.Write() 함수를 호출하여 Bad Request임을 알리는 Body를 작성하고 header의 status를 선언합니다.
해당 테스트 코드를 실행하면 status code가 200 OK로 응답합니다. Write 메서드를 호출하면 Go는 http.StatusOK 상태로 설정하여 결과의 상태 코드가 200 OK가 됩니다.
이것은 Go의 설계 철학으로 응답 본문을 작성하기 전에 헤더를 써야 하는 의도를 보여줍니다. 만약 상태 코드를 먼저 설정한 후 응답 본문을 쓰면 응답의 상태 코드가 올바르게 설정됩니다.
미들웨어
미들웨어란 http.Handler를 매개변수로 받아서 http.Handler를 반환하는 재사용할 수 있는 함수로 구성됩니다. 미들웨어는 여러 방법으로 사용할 수 있습니다. 요청을 필터링하거나, 헤더를 미리 설정하거나, 인증 설정을 하거나, 로깅 요청을 하며, 에러 반환, 리소스 접근 제어 등 다양한 재사용할 수 있는 기능을 처리합니다.
실무에서 하나의 미들웨어 함수에서 너무 많은 일을 처리하는 것을 권장하지 않습니다. 최소한 한 가지 기능을 매우 잘하는 미들웨어를 작성하는 것이 올바른 방법입니다. net/http 패키지에는 정적 파일을 서빙하거나 요청을 리다이렉트 하고 타임아웃을 관리하는 유용한 미들웨어를 제공합니다.
서버의 전체 설정으로 읽기와 쓰기의 타임아웃을 설정하면 데이터 스트리밍 혹은 핸들러별 타임아웃이 상이해야 하는 경우 적용이 어려워집니다. 이런 경우 미들웨어 혹은 각각의 핸들러에서 타임아웃을 관리해야 합니다. http.TimeoutHandler 함수는 http.Handler와 대기시간, 그리고 응답 본문에 쓸 문자열을 매개변수로 받은 후 내부적으로 동작하는 타이머를 설정합니다.
package httpserver

import (
	"io"
	"net/http"
	"net/http/httptest"
	"testing"
	"time"
)

func TestTimeoutMiddleware(t *testing.T) {
	handler := http.TimeoutHandler(
		http.HandlerFunc(func(w http.ResponseWriter, r *http.Request) {
			w.WriteHeader(http.StatusNoContent)
			time.Sleep(time.Minute)
		}),
		time.Second,
		"Timed out while reading response",
	)
	r := httptest.NewRequest(http.MethodGet, "http://tstst", nil)
	w := httptest.NewRecorder()

	handler.ServeHTTP(w, r)
	resp := w.Result()
	if resp.StatusCode != http.StatusServiceUnavailable {
		t.Fatalf("unexpected status code: %q", resp.Status)
	}

	b, err := io.ReadAll(resp.Body)
	if err != nil {
		t.Fatal(err)
	}

	_ = resp.Body.Close()
	if actual := string(b); actual != "Timed out while reading response" {
		t.Logf("unexpected body: %q", actual)
	}
}
미들웨어는 다양한 용도로 활용할 수 있습니다. 특히 인증(Authentication)과 같은 공통 기능을 구현할 때 매우 유용합니다.
기본적인 인증 미들웨어는 다음과 같은 방식으로 동작합니다. 먼저 클라이언트의 요청에서 인증 정보(예: Authorization 헤더)를 확인합니다. 인증 정보가 유효하다면 다음 핸들러로 요청을 전달하고, 그렇지 않다면 401 Unauthorized 상태 코드와 함께 에러 응답을 반환합니다.
이러한 미들웨어 패턴을 사용하면 각 핸들러마다 인증 로직을 반복해서 작성할 필요 없이, 미들웨어를 체인처럼 연결하여 재사용 가능한 코드를 작성할 수 있습니다. 예를 들어, 로깅 미들웨어 → 인증 미들웨어 → 실제 비즈니스 로직 핸들러 순서로 연결하여 각 요청이 순차적으로 처리되도록 구성할 수 있습니다.
package httpserver

import (
	"encoding/base64"
	"fmt"
	"io"
	"net/http"
	"net/http/httptest"
	"strings"
	"testing"
)

// BasicAuthMiddleware는 기본 인증을 수행하는 미들웨어입니다
func BasicAuthMiddleware(username, password string) func(http.Handler) http.Handler {
	return func(next http.Handler) http.Handler {
		return http.HandlerFunc(func(w http.ResponseWriter, r *http.Request) {
			// Authorization 헤더 확인
			auth := r.Header.Get("Authorization")
			if auth == "" {
				w.Header().Set("WWW-Authenticate", `Basic realm="Restricted"`)
				http.Error(w, "Unauthorized", http.StatusUnauthorized)
				return
			}

			// Basic 인증 파싱
			const prefix = "Basic "
			if !strings.HasPrefix(auth, prefix) {
				http.Error(w, "Invalid authorization header", http.StatusUnauthorized)
				return
			}

			// Base64 디코딩
			decoded, err := base64.StdEncoding.DecodeString(auth[len(prefix):])
			if err != nil {
				http.Error(w, "Invalid authorization header", http.StatusUnauthorized)
				return
			}

			// username:password 형식으로 분리
			credentials := strings.SplitN(string(decoded), ":", 2)
			if len(credentials) != 2 {
				http.Error(w, "Invalid authorization header", http.StatusUnauthorized)
				return
			}

			// 인증 정보 검증
			if credentials[0] != username || credentials[1] != password {
				http.Error(w, "Unauthorized", http.StatusUnauthorized)
				return
			}

			// 인증 성공 시 다음 핸들러 호출
			next.ServeHTTP(w, r)
		})
	}
}

// LoggingMiddleware는 요청을 로깅하는 미들웨어입니다
func LoggingMiddleware(next http.Handler) http.Handler {
	return http.HandlerFunc(func(w http.ResponseWriter, r *http.Request) {
		fmt.Printf("Request: %s %s\n", r.Method, r.URL.Path)
		next.ServeHTTP(w, r)
	})
}

func TestAuthMiddleware(t *testing.T) {
	// 보호된 리소스를 반환하는 핸들러
	protectedHandler := http.HandlerFunc(func(w http.ResponseWriter, r *http.Request) {
		w.WriteHeader(http.StatusOK)
		fmt.Fprint(w, "Welcome! You are authenticated.")
	})

	// 미들웨어 체인 구성: 로깅 -> 인증 -> 핸들러
	handler := LoggingMiddleware(
		BasicAuthMiddleware("admin", "secret123")(protectedHandler),
	)

	testCases := []struct {
		name           string
		username       string
		password       string
		expectedCode   int
		expectedBody   string
		setAuth        bool
	}{
		{
			name:         "Valid credentials",
			username:     "admin",
			password:     "secret123",
			expectedCode: http.StatusOK,
			expectedBody: "Welcome! You are authenticated.",
			setAuth:      true,
		},
		{
			name:         "Invalid username",
			username:     "user",
			password:     "secret123",
			expectedCode: http.StatusUnauthorized,
			expectedBody: "Unauthorized\n",
			setAuth:      true,
		},
		{
			name:         "Invalid password",
			username:     "admin",
			password:     "wrongpass",
			expectedCode: http.StatusUnauthorized,
			expectedBody: "Unauthorized\n",
			setAuth:      true,
		},
		{
			name:         "No credentials",
			expectedCode: http.StatusUnauthorized,
			expectedBody: "Unauthorized\n",
			setAuth:      false,
		},
	}

	for _, tc := range testCases {
		t.Run(tc.name, func(t *testing.T) {
			r := httptest.NewRequest(http.MethodGet, "http://test/protected", nil)

			// 인증 헤더 설정
			if tc.setAuth {
				auth := base64.StdEncoding.EncodeToString(
					[]byte(fmt.Sprintf("%s:%s", tc.username, tc.password)),
				)
				r.Header.Set("Authorization", "Basic "+auth)
			}

			w := httptest.NewRecorder()
			handler.ServeHTTP(w, r)

			resp := w.Result()
			if resp.StatusCode != tc.expectedCode {
				t.Errorf("expected status code %d; got %d", tc.expectedCode, resp.StatusCode)
			}

			body, err := io.ReadAll(resp.Body)
			if err != nil {
				t.Fatal(err)
			}
			resp.Body.Close()

			if string(body) != tc.expectedBody {
				t.Errorf("expected body %q; got %q", tc.expectedBody, string(body))
			}
		})
	}
}

func TestMiddlewareChaining(t *testing.T) {
	// 여러 미들웨어를 체인으로 연결하는 예제
	finalHandler := http.HandlerFunc(func(w http.ResponseWriter, r *http.Request) {
		fmt.Fprint(w, "Success!")
	})

	// 미들웨어를 순서대로 적용
	handler := LoggingMiddleware(
		BasicAuthMiddleware("user", "pass")(finalHandler),
	)

	r := httptest.NewRequest(http.MethodGet, "http://test/api/resource", nil)
	auth := base64.StdEncoding.EncodeToString([]byte("user:pass"))
	r.Header.Set("Authorization", "Basic "+auth)

	w := httptest.NewRecorder()
	handler.ServeHTTP(w, r)

	resp := w.Result()
	if resp.StatusCode != http.StatusOK {
		t.Errorf("expected status 200; got %d", resp.StatusCode)
	}

	body, _ := io.ReadAll(resp.Body)
	resp.Body.Close()

	if string(body) != "Success!" {
		t.Errorf("expected body 'Success!'; got %q", string(body))
	}
}
멀티플렉서
멀티플렉서는 클라이언트의 요청을 특정한 핸들러로 라우팅해주는라우팅 해주는 범용 핸들러입니다. http.ServeMux 멀티플렉서는 클라이언트의 요청을 올바른 핸들러로 라우팅 해주는 http.Handler 인터페이스입니다. 등록할 핸들러와 핸들러가 동작할 패턴을 등록해 주면 URL 경로를 등록한 패턴과 비교하여 올바른 핸들러로 요청을 전달합니다.
멀티플렉서를 사용하여 요청을 3개의 핸들러로 보내는 예제를 작성해보겠습니다.
package httpserver

import (
	"fmt"
	"io"
	"net/http"
	"net/http/httptest"
	"testing"
)

func drainAndClose(next http.Handler) http.Handler {
	return http.HandlerFunc(
		func(w http.ResponseWriter, r *http.Request) {
			next.ServeHTTP(w, r)
			_, _ = io.Copy(io.Discard, r.Body)
			_ = r.Body.Close()
		},
	)
}
func TestSimpleMux(t *testing.T) {
	mux := http.NewServeMux()
	mux.HandleFunc("/", func(w http.ResponseWriter, r *http.Request) {
		w.WriteHeader(http.StatusNoContent)
	})

	mux.HandleFunc("/hello", func(w http.ResponseWriter, r *http.Request) {
		_, _ = fmt.Fprintf(w, "Hello friends.")
	})

	mux.HandleFunc("/hello/there/", func(w http.ResponseWriter, r *http.Request) {
		_, _ = fmt.Fprint(w, "Why, hello there.")
	})

	m := drainAndClose(mux)

	tc := []struct {
		path     string
		response string
		code     int
	}{
		{"http://test/", "", http.StatusNoContent},
		{"http://test/hello", "Hello friends.", http.StatusOK},
		{"http://test/hello/there/", "Why, hello there.", http.StatusOK},
		{"http://test/hello/there", "<a href=\"/hello/there/\">Moved Permanently</a>.\n\n", http.StatusMovedPermanently},
		{"http://test/hello/there/you", "Why, hello there.", http.StatusOK},
		{"http://test/hello/and/goodbye", "", http.StatusNoContent},
	}

	for i, c := range tc {
		r := httptest.NewRequest(http.MethodGet, c.path, nil)
		w := httptest.NewRecorder()

		m.ServeHTTP(w, r)
		resp := w.Result()
		if actual := resp.StatusCode; c.code != actual {
			t.Errorf("%d: expected code %d; actual %d", i, c.code, actual)
		}

		b, err := io.ReadAll(resp.Body)
		if err != nil {
			t.Fatal(err)
		}

		_ = resp.Body.Close()
		if actual := string(b); c.response != actual {
			t.Errorf("%d: expected response %q; actual %q", i, c.response, actual)
		}
	}
}
3개의 엔드포인트를 가지는 멀티플렉서를 선언합니다. 테스트 케이스는 경로와 일치하거나 일치하지 않는 케이스를 정의합니다. 이를 통해 멀티플렉서가 요청 경로에 따라 올바른 핸들러로 라우팅 하는지 검증할 수 있습니다.
HTTP/2 서버 푸시
서버에서 클라이언트에게 리소스를 푸시하는 기능을 이용하면 잠재적인 효율성을 개선할 수 있습니다. 이는 사용하는 케이스에 따라서 효율적이 될 수도 있고 그렇지 않을 수도 있습니다.
클라이언트에게 리소스 푸시
Go 언어를 사용한 리소스 푸시는 다음과 같은 코드를 통해 구현 가능합니다.
func run(addr, files, cert, pkey string) error {
	mux := http.NewServeMux()
	mux.Handle("/static/", http.StripPrefix("/static/", RestrictPrefix(".", http.FileServer(http.Dir(files)))))
	mux.Handle("/", http.HandlerFunc(func(w http.ResponseWriter, r *http.Request) {
		if pusher, ok := w.(http.Pusher); ok {
			targets := []string{
				"/static/style.css",
				"/static/hiking.svg",
			}
			for _, target := range targets {
				if err := pusher.Push(target, nil); err != nil {
					log.Printf("%s push failed: %v", target, err)
				}
			}
		}

		http.ServeFile(w, r, filepath.Join(files, "index.html"))
	}))

	srv := &http.Server{
		Addr:              addr,
		Handler:           mux,
		IdleTimeout:       time.Minute,
		ReadHeaderTimeout: 30 * time.Second,
	}

	done := make(chan struct{})

	go func() {
		c := make(chan os.Signal, 1)
		signal.Notify(c, os.Interrupt)

		for {
			if <-c == os.Interrupt {
				if err := srv.Shutdown(context.Background()); err != nil {
					log.Printf("shutdown: %v", err)
				}
				close(done)
				return
			}
		}
	}()

	log.Printf("Serving files in %q over %s\n", files, srv.Addr)

	var err error
	if cert != "" && pkey != "" {
		log.Println("TLS enabled")
		err = srv.ListenAndServeTLS(cert, pkey)
	} else {
		err = srv.ListenAndServe()
	}

	if err == http.ErrServerClosed {
		err = nil
	}

	<-done

	return err
}
메인 페이지 요청 시 CSS와 SVG를 미리 푸시해서 리소스 로딩 속도를 향상할 수 있습니다. 서버는 TLS 인증서 유무에 따라 HTTP 또는 HTTPS로 동작하며, 서버의 요청이 전부 마무리되기 전까지 대기하다가 서버가 종료되는 Graceful Shutdown 구조로 되어 있습니다.
HTTP/2 서버 푸시는 클라이언트가 명시적으로 요청하기 전에 서버가 필요할 것으로 예상되는 리소스를 미리 전송할 수 있게 해 줍니다. 이를 통해 네트워크 왕복 시간을 줄이고 페이지 로딩 속도를 개선할 수 있습니다. 다만 모든 상황에서 유용한 것은 아니므로, 실제 애플리케이션의 특성과 요구사항에 맞게 적용해야 합니다.
'School > GNPS' 카테고리의 다른 글
| [GNPS] 챕터 12 데이터 직렬화 (0) | 2025.11.18 |
|---|---|
| [GNPS] 챕터 11 TLS 통신 보안 (0) | 2025.11.15 |
| [GNPS] 챕터 8 HTTP 클라이언트 작성 (0) | 2025.11.11 |
| [GNPS] 챕터 7 유닉스 도메인 소켓! (0) | 2025.11.08 |
| [GNPS] 챕터 6 UDP 통신의 신뢰성 확보 (0) | 2025.11.07 |


